Are you looking forward to giving your old bathroom a facelift? Whether your goal is to enhance the space look and feel, add functionality, or boost your home’s value, bathroom restoration doesn’t have to be overwhelming. But here’s the thing: to renovate an outdated bathroom to your expectations, you have to do it right. And that’s where this step-by-step guide on bathroom restoration comes in.
But First: Preparations for Bathroom Renovation
Once the thought of DIY bathroom renovation has crossed your mind, start preparing adequately. That’s the only way to avoid frustrations. Preparation ensures that the project runs smoothly from start to finish. It’s because you have the plan of how everything will go through.
Most often, people tend to prioritize the budget and assume the rest. The reality is transforming your bathroom will require skills, lots of time, and money. In addition to the renovations budget, you’ll have to take into consideration the following:
Bathroom Design
Research for the best design styles online for inspiration. But remember, the design you opt for should complement your budget, lifestyle, and daily routines. With multiple designs coming up, you need to settle on something you can execute with ease.
Take into account the color scheme to avoid clashing the bathroom look. You need colors that allow for a smooth transition from the bathroom to the next room. Based on what you want to achieve, the color scheme will vary. But you can’t go wrong with fresh, vibrant, and calming colors.
Does your space allow for a big tub? Can the bathroom accommodate new fixtures? Plan your space, get accommodative fixtures and add the storage spaces correctly without altering your design layout. The functionality and aesthetics of the bathroom receive a boost with proper spacing and positioning of fixtures and utilities.
Renovation Tools and Supplies
Renovations involve so much work. From demolition, plastering to tiling, and much more. You probably have a few materials with you. But depending on the nature of bathroom renovation at hand, you’ll need more or different tools and materials. Match your project with specialty tools for safe renovations, smooth work, and quality output.
It can be challenging if you’re doing the renovations for the first time. Instead of spending a considerate amount of money on buying remodeling tools you might not use again soon, renting from a local home improvement store is a viable option. So, which bathroom renovation tools and supplies do you need?
The renovation supplies may include the following: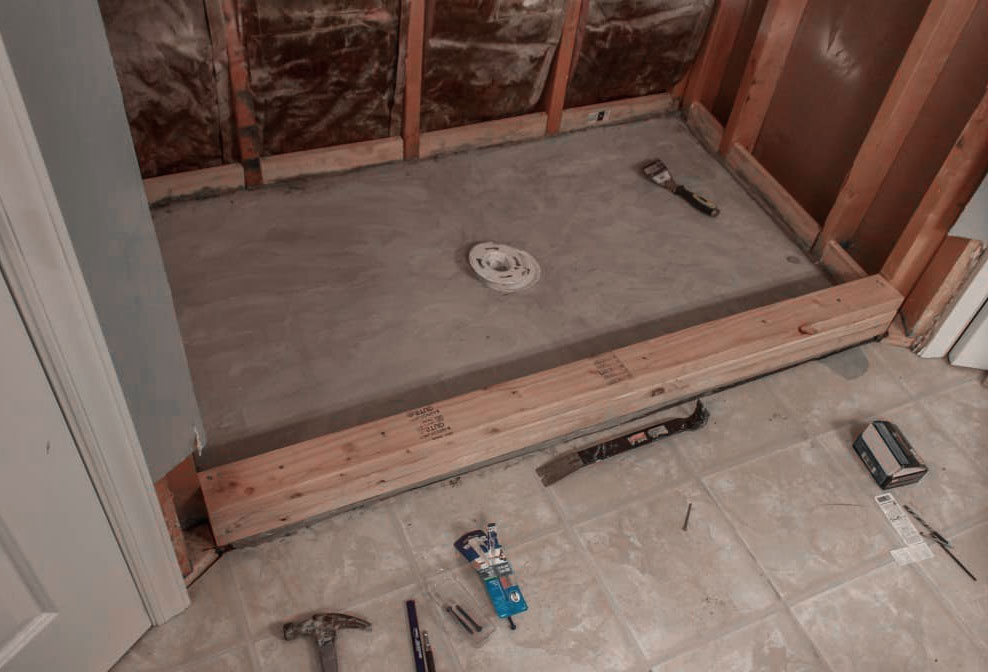
• Doors, windows & skirting
• Ventilation
• Toilets
• Lighting
• Water faucets/taps
• Shower and bathtub materials
• Walls and flooring
• Sinks
• Vanities, counters, cabinets, countertops, and storage spaces
The renovation tools include the following:
• Power drill
• Pry bar
• Chisel
• Tape measure
• Flathead screwdriver
• Adjustable wrench
• Hammer
• Goggles
• Gloves
• Safety mask
• Caulking gun
• Bucket
• Extension cord
• Spackle knife
• Stud finder
• Hacksaw
• Chalk line
• Spackle
• Utility knife
• Silicone sealant
• Cordless drill
• Wet-dry Shop-Vac
10 Procedural Steps to Follow During Bathroom Renovation
Ready to breathe a new life to your bathroom? With an actionable plan and renovation accessories in place, you can now start the project. Follow this step-by-step guide and have some fun renovating your bathroom. It’s a proven procedural approach that many have leveraged in their renovations and witnessed fantastic results. Here we go!
Step 1: Demolitions – Remove the Old Stuff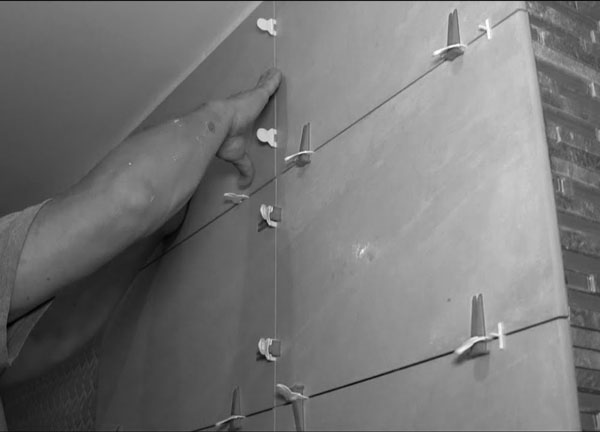
Renovation starts with getting rid of anything you don’t want. If you’re doing a complete renovation, remove everything and start afresh. Removing old fixtures isn’t time-consuming when you have the right tools. However, make sure you don’t cause damages that might inconvenience the whole process.
Start with draining the bathroom and remove the toilet if it’s worth replacing. Doing so ensures there will be no unnecessary foul-smelling spills. Next, remove the bathtub. For easy removal, access, and rectification of the plumbing linking to the bathtub, remove the tiles before the tub.
Remove the drywall, plaster sheets, or installed insulation. If the shower walls have substandard materials with accumulated molds and mildew and can no longer resist water, removal is the best thing. Put on your gloves, safety mask, and goggles for maximum protection.
Lastly, remove the mirrors, vanities, cabinets, tiles, and anything else you want to replace. Flooring removal require a well-thought approach for quality and timely tiling later on. After removing everything, you’ll have a clean and open space easy to work on. But again, keep your debris in one area to avoid an unsightly home environment.
Step 2: Fix Your Plumbing and Wiring
With walls open, this is the best time to rectify the plumbing system, fix electrical issues, and install the important fixtures. Since plumbing plays a crucial role in your shower screed makeover, you need to understand the piping system to ensure everything goes on as you anticipate. How easy and fast you install the plumbing fixtures depends on the effectiveness of your piping system.
Take some time to assess the present condition and make changes to the pipes. With well-fixed quality pipes of the right size, go ahead and install the sink, faucet, shower, and bathtub. You can opt to fix the toilet later. But first, your bathroom dimensions, door location, and capacity will determine the nature of the fixtures you choose. Every fixture must sit comfortably in the space without inconveniencing the bathroom users.
With plumbing updated, ensure the wiring system complements your installations like lighting, cabinets, and vanity. That means you’ll have to adjust the wiring for easy access. Position the sockets where you find appropriate and cover them for your safety.
Bathrooms have several plumbing fixtures and drain interlinked with the home water supply and waste drainage. A slight mistake can cost you a lot. Consult an expert for technical answers. More so, you’ll need a licensed electrician for electrical rewiring to avoid exposure to electrical risks.
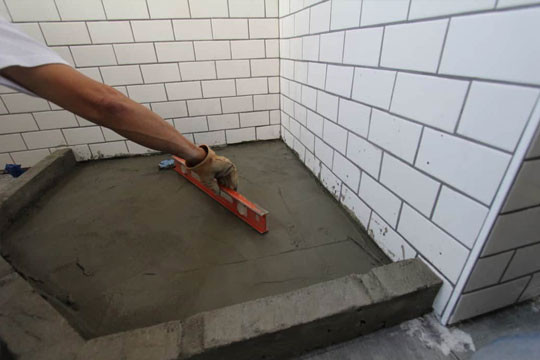
Step 3: Install New Plaster Sheets
Plastering your bathroom can be pretty practical, costly, and time-consuming. However, installing plaster or cement sheets on the existing shower screed is the most convenient way to develop a smooth and neat finish. More so, you enjoy features like durability and resistance to expansion and physical breakage. The sheets are also resistant to moisture, and you won’t have to worry about molds.
But again, that’s possible if you fix the sheets slowly and methodically with appropriate tools and materials. But how do you go about that? Start with positioning the plaster sheets on the floor and fasten them with non-resistant screws. Install more sheets on the walls and ceiling. Plaster the joints of the sheets, apply joint tape or silicone sealers at the interjecting gaps for uniformity, and allow the surface to heal before waterproofing and tiling.
Be keen on the measurements to avoid miscalculations. You’ll need to order the correct size and thickness to get value for your money. Some manufactures also recommend the best DIY installation practices, and it’ll be worth checking every detail to stay abreast.
Step 4: Bathroom Waterproofing
Waterproofing is a must-have step if you’re planning to have a tile shower base. While you can do it on any shower screed surface, make sure your cement or plaster screed is clean, free of dust or debris, and completely dry. You can then apply your liquid or adhesive waterproofing substance to the basement and shower walls.
But first, measure the entire area you want to waterproof for easy fitting and ensuring you have enough pieces. Start with fixing the corners, the plumbing fittings, the wall, and finalize with the floor. Apply adequate pressure on the membrane during installation to ensure there are no air pockets captured. Make sure you keenly check all the areas for correction and finishing before the next stage.
Water seepage from below and above can result in extensive damage to your bathroom. It also makes it hard for fixed tiles to serve for long. In some instances, water damage results in cracks and breaks, which breeds mold due to dampness. Waterproofing your basement or the entire shower area with a suitable membrane offers maximum protection.
Step 5: Fix New Tiles
With the underlayment ready, fixing new tiles on the sturdy and leveled space shouldn’t take long. Proper installation of bathroom tiles guarantees a long-lasting, good-looking, and easy-to-maintain space. When coupled with the best tile designs that perfectly match your home’s theme, you’ll be happy to have a durable and stylish space without spending a lot of money.
Start with measuring the floor to know the amount of grout and tiles needed. When laying the tiles, start from the edges and fix whole tiles first with correct spacing. Drawing perpendicular lines to follow and adding spacers helps avoid approximation errors. In uncompleted areas, cut tiles of appropriate size and fix them without altering the tile layout. Engage a professional tiler where necessary.
Step 6: Bathroom Grouting
With all tiles fixed, go ahead and fill the spaces between the tiles with grout. Settle on cement-based grout or epoxy grout based on what you want to achieve. The good thing with grouting is you can be sure of uniformity and clean areas between the tiles. Again, the tiles won’t shift or disorient, and the chances of damages are low.
For a perfectly finished look, read the manufactures instructions before mixing the grout. After that, test its usability, and if ready, spread in sections and later expand to the entire space. Leave the grout the rest based on instructions, and later wipe with a sponge and water. Applying the grout sealer when the grout dries completely will help protect the grout and reduce tile staining.
Grouts come in varying colors; a monochromatic color blends well with tiles, and it’s not easy to note the difference when compared with tiles. The dichromatic color shows contrasts with your tiles. The decision you make depends on your taste and preference.
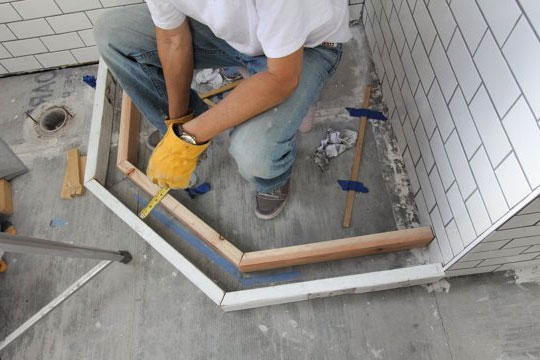
Step 7: Install Shower Screen Glass
Bathroom renovation isn’t complete without installing the wet room glass panel or shower screen. It’s the best way to show your private space some love while improving the bathroom’s aesthetics and comfort. Ready for this fun undertaking that transforms your shower area? Well, for excellent results, keenness and precision are a must.
Mark the entire area you want the screen to sit. Next, mark and drill the screw holes with the right drill bit. Attach the aluminum brackets on the marked wall areas and the floor. With quality plugins in place, fix your one glass panel keenly to avoid dropping or chipping it. A support bar comes in handy to ensure your walk-in shower screen fits firmly.
Step 8: Paint the Walls
Painting is an optional step because your bathroom has already started showcasing good-looking and satisfactory features. It’s, however, necessary if you haven’t fixed tiles on the entire wall. Painting your cement sheets boosts their appearance and durability.
First, ensure the area you want to paint is clean and smooth. Since the bathroom wall might have accumulated some grease or paint, a complete removal ensures that paints stick firmly for quality results. Don’t start painting until the area is dry. When sure the surface is dry, start priming the paint and apply several thin layers consecutively. Finish the process by applying the paint sealant.
You’re likely to get confused when choosing the bathroom paint colors. Remember your bathroom is a relaxing place, and you need colors that complement your mood. Have a look at your tiles, lighting, and overall home color scheme and decide what’s best for you.
Step 9: Caulking the Entire Room
With bathroom restoration almost complete, bathroom caulking is the best thing you can do to avoid future water damage. It’s easy to assume the gaps and tiny spaces, but taking a step and applying new caulking around your installed fixtures and materials is a game-changer. Such openings result in massive problems that might break your bank when not handled on time.
Apply caulk to all the susceptible areas of your bathroom, from bathtub, flooring, vanity, cabinets, and walls to showerheads. Before applying caulk, make sure the surfaces are dry and very adjacent to each other. You can now cut the caulk tube and smear the vital areas with a caulk gun. Use the masking tape to hold the caulk until new joint forms.
There are different types of caulking to choose from. However, silicone caulk seems to get preference from many contractors. It’s water-resistant, crack-proof, flexible, and permanent. You can also choose the color that you’re comfortable with.
Step 10: Fit Decorative Accessories
At this point, install and add any accessories that you’ve wanted without altering your bathroom layout, design, and functionality. With different types of accessories available to choose from, work with your budget and needs in mind.
But of course, you can’t go wrong with tap wear, designer mirrors, quality lights, fans, vanity, cabinets, and the toiletries shelves. Others accessories like holders, soap dispensers, and towel bars can be added later based on the order of necessity and preference.
Look Forward to a Remodeled Bathroom
The secret to a successful bathroom renovation is preparing adequately and following this Step by step guide. Whether you’re doing the renovations for the first time or not, don’t shy away from bathroom restoration professionals like us! A simple inquiry might save you from potential renovation risks and money loss.
Interested in bathroom reno? See our article on important things you don’t need to know about showers.